Twitter and traditional website marketing don’t seem like they’re very compatible at first glance. Twitter is a very transient platform, where messages have a lifespan measured in minutes. On the other hand, websites last indefinitely. A blog post now can be as valuable in a year as it ever was, or even more valuable if it becomes the only good resource for a lingering problem.
Most people simply use Twitter as a sort of short-lived broadcast of updates. They tweet when they post a new blog post, they tweet when there’s a new product announcement or something similar, but that’s about it. They don’t really explore the social aspects of the site. There’s a lot more to Twitter than just one sided announcements from your website.
That’s why you might want to start embedding your Twitter in your website. When you have incentive to expand beyond one-directional messaging, you realize the full potential of the microblogging site. Plus, you enable people to follow your Twitter from your site, which they won’t necessarily do otherwise. After all, if all you post is website updates and they already follow your website, why would they follow your Twitter?
I’m not here to talk to you about how to use Twitter effectively. There are other posts about that. I’m here now to help you embed Twitter on your site.
Methods and Decisions
The first thing you need to decide is how you want to embed your tweets. There are a few possible options.
- You can embed your entire Twitter feed.
- You can embed specific individual tweets.
- You can use a WordPress plugin to embed either one.
- You can use social sharing buttons.
The fourth option isn’t really within the scope of this article, since we’re talking about tweets. Sharing buttons are great and all, but they aren’t the focus of this post.
Number three is just number one or two, but when you have WordPress as your CMS rather than a stand-alone website. I’ll talk about it once I’ve talked about the other two methods first.
Embedding Individual Tweets
The way I see it, there are two reasons to embed individual tweets on your website. The first reason is pretty simple; you posted something and you want that tweet to have a lot of extra life. Normally tweets die down very quickly, and only your pinned tweet is going to get much extended love. That means if you’re doing something like selling and promoting an ebook, you’ll want to tweet about it repeatedly over the course of the weeks or months you’re trying to get it to sell. This can get tiring quickly, and it can flood your audience if you don’t tweet about other things as well.
My typical usage is to dial back a bit on the tweets about such promotions, and embed a couple of the best tweets on my site. Throw one into the top of a blog post or in a sidebar as a “hey, by the way, we’re still totally selling this ebook” and you essentially fire and forget it. That tweet will get extra engagement, views, reach, and clicks because it’s promoted through Twitter, through your website, and through anyone who links to the page where it’s embedded.
The other reason to embed tweets is to use them as examples or illustrations. I’ve seen a lot of posts that are “best of” roundups that embed tweets. The top 10 Twitter fails could embed the original tweets, for example. That one isn’t a GREAT example, since a lot of the biggest fails get removed, so screenshots work better there. However, a 10 best tweets with pictures, ten best tweets about cats, ten best marketing tweets, these sorts of examples aren’t likely to be removed entirely.
These tweets have one drawback, and that’s the fact that a lot of times, they won’t be your tweets. When you’re doing a best of roundup, it’s kind of rude and arrogant to include yourself on the list, especially more than once.
However, there are other reasons to include your own tweets in your posts. You can use it to illustrate that you have a Twitter account (post a hello world message and embed that) or to funnel traffic to your customer service account. You can post an exchange between yourself and a few others; embed the question and embed answers, and talk about those answers in the blog post.
So what about the actual process of embedding tweets? Thankfully, it’s very easy, regardless of the system you use for it. By that, I mean that it works within the WordPress compose window or through any other blog CMS very easily.
All you have to do is:
- Navigate the web and find the tweet you want to embed.
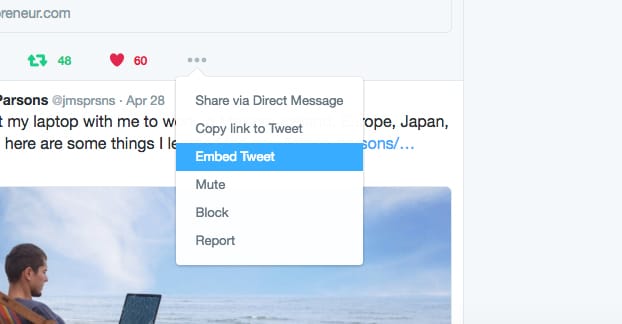
- Click the … icon located to the right of the retweets and likes.
- Click “embed tweet” in the menu that appears.
- This will create a lightbox with options. At the top is a box with code. Below this is a preview of the tweet as it will appear on your website.
- Copy the code from the top box and paste it into your blog post in the specific area you want the tweet to appear.
There are a few additional context options that might appear. If the tweet is a reply to another tweet, there will be a box that says “include parent tweet.” If you check this box, the parent tweet will appear, looking something like this:
If the tweet you choose to embed has a picture, Vine, or other piece of media, you can choose to include it. The resulting tweet will look like this:
If you just choose to include the tweet, only the tweet will be shown.
I highly recommend embedding tweets liberally. Not only do you get to illustrate points with tweets directly from the source – which helps make sure people trust you to not be editing them – but you can do a certain amount of influencer marketing with them as well. People like when their Twitter accounts are shared, and an embed on a website is a great persistent share.
Embedding your Entire Twitter Feed
Okay, so you can’t actually embed your entire feed. If you’ve posted more than five or six times, only the most recent half dozen will be shown. That’s a good thing, though! You don’t want an infinitely long box of social data in a sidebar on your website. That would be more than a little insane.
There are two primary reasons why you might want to embed your Twitter feed. The first is to put it in a main blog post, to illustrate that you have a Twitter feed. It’s not meant to be incorporated into the narrative of the post in a specific way like a tweet is individually.
The other reason is to embed it in a sidebar so it’s always there, a passive and present reminder that you have a Twitter feed that people can follow. A timeline embed, as they’re called, allows you to showcase your most recent tweets alongside a button that allows anyone to follow you quickly and easily.
There are actually two different forms of embedded timeline. The templates determine how the timeline is displayed, what shows up, and how it all looks. They are:
- List template. This shows tweets in chronological order, newest first, with all of the usual information. It shows profile picture, name, display name, tweet content, media, and engagement.
- Grid template. This shows primarily a grid of media, including images, gifs, and Vines, laid out with one primary example up top and others in smaller boxes below. The content of the tweet beyond the media – the name and text, there’s no engagement or profile picture on this one – show up overlaid on top of the image.
On top of this, there are different types of content that can be embedded. It doesn’t just have to be your timeline. Most marketers and businesses choose to just use the one user timeline, but some collectives, groups, and organizations might want to use other formats.
- User Timeline. This shows just your tweets, nothing from other users except for when you retweet content.
- User Likes. This is a feed that shows all of the posts liked by a given user. It’s otherwise identical to a user timeline feed.
- User List Timeline. This shows the timeline of tweets for everyone within a list of users, curated by whoever chose to put the list together. The embed shows the list name as well as the individual names of the people in the list.
- Search Timeline. This shows the results of a given search, updated when the user views the page that loads the embedded widget. For example, you can embed the search results for searching for a particular hashtag. This is useful for some forms of Twitter marketing, but is less useful as a general curation tool, particularly because it’s easily exploitable.
- Collection. This is like embedding several hand picked tweets, but you can update the curated collection rather than updating the post with new embeds.
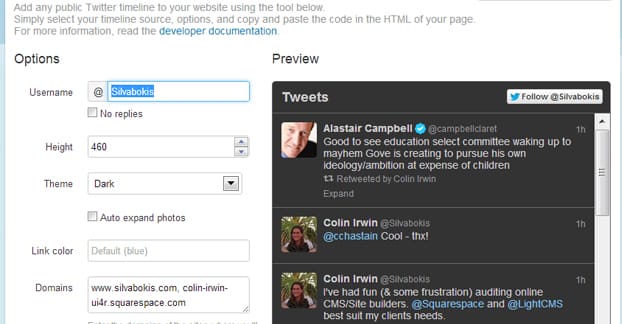
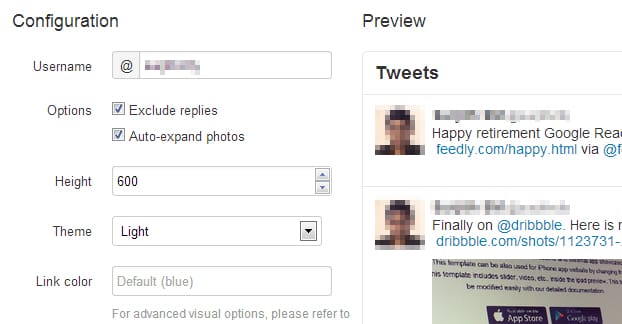
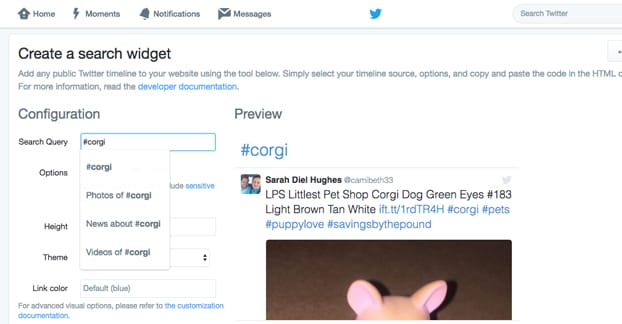
So how do you embed a timeline? It’s a little more complex than embedding a tweet. The first thing you need to do is create a new timeline widget, which requires you to fill out this form on Twitter itself.
The form allows you to choose which of the timeline sources you want. Under user timeline, you can choose the username, choose to exclude replies, set the height, choose between light and dark themes, change the link color, and opt out of tailoring. Tailoring is the word for Twitter harvesting data for use in analytics later on. The likes config has all of the same options. The list feed requires you to have and manage a list, or subscribe to the list you want to embed. The search allows you to choose the search query, choose to set safe search mode, choose to only show top tweets, and the other options shared from other sources. Finally, the collection mode requires that you create a collection in order to use it.
Additionally, there are customization options for the widget. They’re a bit complex to use, however. You have to actually edit the code given to you by the widget when it generates. The options are:
- Noheader: this hides the header for the timeline, which hides Twitter attribution. Twitter ToS requires that you have attribution, this simply allows you to customize how and where it appears on your site.
- Nofooter: this hides the footer with the tweet composer link.
- Noborders: this hides the borders of the widget so you can more seamlessly integrate it with a design that doesn’t match either the light or dark themes for the widget.
- Noscrollbar: this hides the scroll bar so users can’t scroll down within the widget. Useful only if you have a large size for the widget so more than one message can be displayed in full.
- Transparent: this makes the widget background color transparent.
- Height and Width: obviously enough, these allow you to change the precise dimensions of display. Note that the minimum widget is 180 pixels for the list template and 220 for the grid. Both have a maximum of 520 pixels wide.
- Data-tweet-limit: this allows you to set the exact number of tweets you want shown by the widget at any given time. It can be anywhere from 1 to 20.
All of these options allow you to customize the widget to fit your site, no matter where you’re trying to put it, so long as there’s enough room.
Once you have generated the widget and customized it, you will have to click “create widget” which will generate the code you copy and paste. It’s simple and easy to plug the code into the right space in your site HTML.
If you’re using WordPress, by the way, you can use one of the many WordPress plugins available for adding tweets and feeds. My favorite is the Twitter Widget with Styling, which gives you a much broader range of customization, including colors, than you get with the normal widget. That said, there are dozens of free and paid options you can pick through; just find one you like.
