When Instagram was created, long before Facebook thought about buying it, it was a mobile app. It was, in fact, touted as one of if not the first entirely mobile social network. This was in the early days of mobile dominance, when smartphones were reaching close to the current levels of saturation but people were still figuring out what they could do with them.
In fact, I would argue that Instagram was somewhat ahead of the game. The reason for this is that they eventually were forced to open themselves up to desktop users. These days, you can log in to Instagram via a desktop browser, but you can’t create an account – you need the mobile app for that – and you can’t upload images. All you can do is browse users, follow users, and engage with photos. This is fine for a casual user looking to get a little higher resolution views of images or engage while they’re stuck at work, but it’s not great for businesses.
I imagine that if Instagram were to be created today, in the days of mobile saturation and dominance, it would look a lot more like SnapChat. I figure that a mobile-only social network today would be more viable and wouldn’t even have to open up to desktop visibility. Of course, that would present all of the same problems as Instagram currently does for businesses, so it’s all moot.
In any case, even today, Instagram doesn’t allow users to post via desktop. This holds true even if you’re using social management tools like HootSuite, tools that use the Instagram API in order to perform actions on the site. Even the API doesn’t allow posting calls; only the official Instagram app does so.
However, there are some workarounds to this lack of desktop functionality, and I’ve done my best to compile them for you. If you want to manage Instagram from a desktop, be it PC or Mac, I’ve got you covered.
Option 1: Send to Phone
The first option is truly a workaround, and doesn’t really get away with eliminating a phone from the process. Capture photos however you please, with a phone camera or a regular digital camera, and put them on your computer. Do whatever editing you want to do, making sure they’re excellent images for Instagram publication. Save them and compose whatever information you want in the description, including hashtags and tags.

Now, you need to figure out how to get the image and description to your phone. See what I mean? You have a few options here. You can put the description in a document and upload both the document and image to your phone directly, using a USB cable and whatever native software is necessary. You can use an intermediary cloud storage service, like Google Drive or DropBox. You can simply email the items to yourself, log into your email on your phone, and download it from there.
All of these methods work, and they can technically be done from your desktop computer, but you still have to have your phone in your hand at some point in the process. You still need to copy in the data and make sure you didn’t break anything in your hashtag formatting. It’s a lot of hassle and it doesn’t solve the problem.
Option 2: Reminder Service
This option is essentially automating the above process using a tool. I’ve already mentioned HootSuite, for example. Buffer and Sendible work in much the same way. They don’t have the ability to use the Instagram API to create posts. What they can do, however, is create everything in such a way as to be easy to send to your phone and post.
For HootSuite, for example, it’s a lot of setup. You need to have HootSuite installed on your computer, and you need to link it to your Instagram account. You need to also have the HootSuite app on your phone, as well as whatever the most recent version of Instagram happens to be.
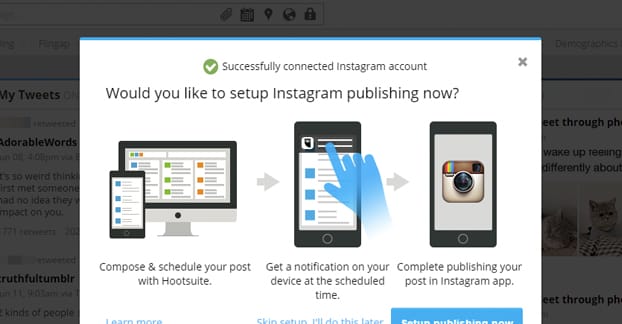
What you do, then, is create your post on the desktop computer through the HootSuite dashboard. You set it to “schedule” to post, which essentially sends the post information and a reminder notification to your phone. When the time comes, your phone will send you a notification and provide you with all of the data in an easy to send format. You can see their instructions here. See the process for publishing on Instagram? You need to basically compose the post on your phone a second time.
The primary problem with this method is that it still doesn’t publish posts for you. All it does is give you the benefits of monitoring all of your social accounts through one app, like HootSuite. The actual Instagram integration is just a scheduling notification. It can’t do anything for you.
Option 3: Uplet
Uplet is the third option, and it promises to be a bit more direct with publication. They also promise that they can bulk upload pictures from your Mac device to your Instagram account all in one go. Here’s how it works.
When you download Uplet and install it on your Mac, all you have to do is run it and log in to your Instagram account through it. From there, it’s just a drag and drop panel where you drag in photos – as many as you want, though you can only post 100 per day on Instagram – and set some options. Each photo can be set to a square crop or the rectangular photo format. You then add your description and tags, then click to share it.
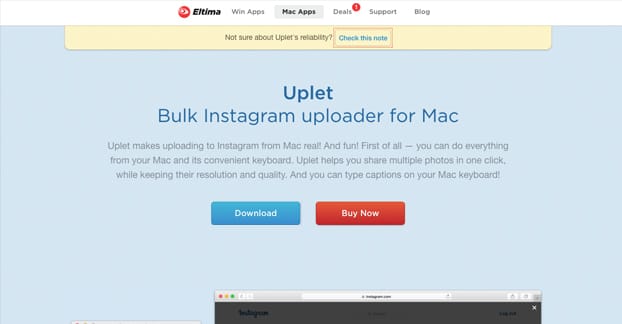
Uplet is essentially an iPhone dev kit running Instagram as a front-end. It emulates an iPhone on your Mac, just enough so that some functions of Instagram work, but not all of them. This is why image editing inside the app is limited. It’s why you can’t search hashtags through it. It’s why you can’t schedule uploads, and it’s why you can’t upload videos.
Uplet has a few drawbacks. For one thing, it’s free on their website but if you want it from the iTunes store, it costs $10. You can also buy it from their website, where a personal license is $20. What’s the difference between the three options? Who knows! They don’t say if there even is a difference. The restrictions above on uploads are another drawback, though most of that is solved by doing your editing outside of the app. Additionally, it’s only for Mac; PC users will be out of luck.
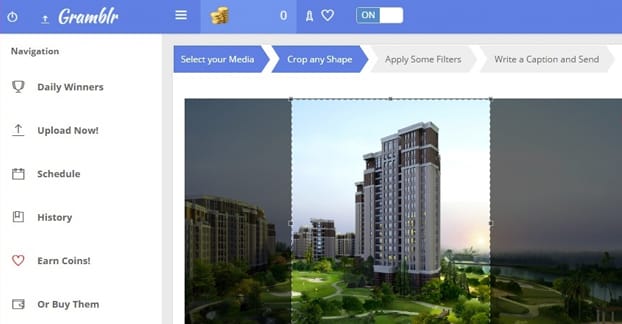
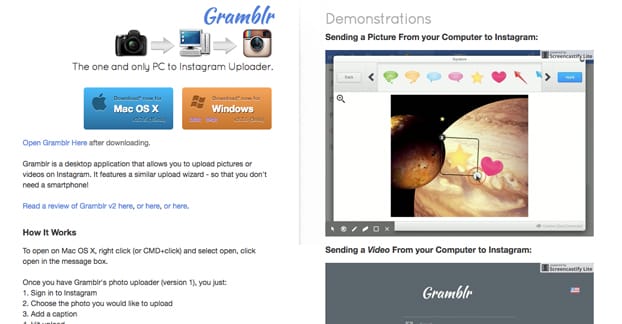
Option 4: Gramblr
Gramblr claims to be “the one and only PC to Instagram Uploader” and I’m somewhat inclined to believe them. It’s hard enough to find options for PC users, when you have apps like Uplet that only work on Macs. Gramblr works for both Mac and PC, though, so let’s see how it stacks up.
Gramblr is a web app with a desktop client, which is why it works on any platform. The app you download is little more than a client program connecting to their web service. You sign in to your Instagram account through this app, and you’re set to work.
In contrast to the previous option, Gramblr has a lot more functionality. They have a full image editor with uploading, scheduling, cropping, and other simple features. Still, if you’re working on a desktop, you’re doing it because you have access to something like PhotoShop, so the editing features of Gramblr are superfluous.
Gramblr does have one catch; your computer has to be online and connected to the internet in order for an upload to occur, regardless of whether you scheduled it. If you wanted to schedule a post for 3am, you have to have your computer online at 3am for it to work. If your computer is off, it has a 30 minute window to get online and connect to the Gramblr web app before the post expires. Pass those 30 minutes and the post expires; you’re out of luck.
The app does have an additional feature, which you might love or hate. It’s a ratings game with coins attached. Essentially, you enter the game and are displayed pictures from other Gramblr users. You can skip them or give them a like. As you like photos, you gain coins, and you can spend those coins to put your pictures into circulation for likes of their own. You might like this feature as an added game, or you might recognize it as a black hat like circulation scheme that puts your account at risk. Up to you.
Thankfully, you are under absolutely no obligation to actually use this feature set. It’s entirely ignorable if you want. You don’t need coins to upload or schedule, and the app itself is free. If all you want is a desktop uploader for Instagram, Gramblr will fill the role admirably.
Option 5: LR/Instagram
Lightroom is one of the premier Mac image editors used for Instagram, and it has some presence on Windows devices as well. I’m not here to judge your preferences of image editor, though. Simply use whatever you like.
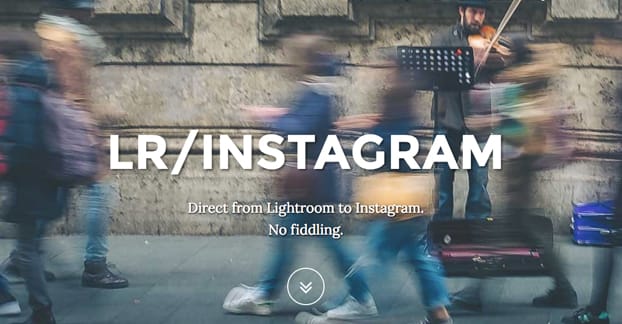
For Lightroom users, a plugin has been created that allows direct uploading to Instagram from Lightroom itself. It’s called LR/Instagram, and it’s simple to use. Just create an image in Lightroom as you would normally, then publish it through this plugin. It adds a new option in the Lightroom Publishing Manager, so it’s super easy to use.
There are a few things to note, though. First, the plugin is neither a Lightroom nor an Instagram app. It’s a third party plugin, so you have to be aware of the potential security issues of logging in through it. Second, it’s not free. It costs $10 to download the plugin, though it does appear to be a one time fee. Third, it has some issues with Instagram limiting the exposure of posts made through it. Supposedly, hashtags posted through LR/Instagram don’t work; the images don’t show up in hashtag searches. This may or may not be fixed by the time you read this, I don’t know.
Option 6: Bluestacks
The sixth and final option on this list is Bluestacks, an Android emulator. It was designed to allow desktop users to play Android games or use Android apps on their desktops. As such, it works for Windows machines, but not Mac. You can download it here.
Since Bluestacks is just an emulator, it’s essentially just a blank Android phone. In order to use it for Instagram, you need to open it and navigate through menus to find and download the Instagram app. Treat it as if it were a phone, get the app from the Google Play store, and log in to your account.
In order to make a post, you will need to have the image in the Bluestacks gallery. Instagram via Bluestacks won’t be able to simply browse your computer. In order to add an image to the gallery, go to the settings menu in Bluestacks and select “import windows files.” This will allow you to add images to the Bluestacks gallery for use in any app, including Instagram.
From there, simply use Instagram as you normally would, via the Bluestacks app. When you upload a file it will pull it from the gallery, and you can add whatever additional editing, description, or hashtags as you desire.
Bluestacks isn’t perfect either, of course. In addition to being Windows-only and Android-only, it requires you to do that extra step of adding content to the gallery. It also occasionally has issues. Some people report that it won’t handle videos, though that seems to be the case with most of these apps. Instagram video is relatively new and kind of janky, so it’s not functional for everyone, even on Instagram itself.
Other Options
Each of the options above has a couple of alternatives that work in the same way floating around. You can use push.photo, Latergram, ScheduGram, Postso, or any of a number of other services. I simply chose the ones that seem to have the best success rates and the fewest issues. Let me know if they stop working, please!


Thank you for this article, James. I use a Windows laptop and Gramblr worked fine when it came to uploading images. The only drawback I’ve encountered is that when I access my Instagram page on my laptop, the display is limited to the last 24 photos I uploaded with Gramblr. However, if I access Instagram on my Motorola 3G, I can see all 35 of the images I uploaded from my laptop using Gramblr. This is the case whether or not I’m logged in to Instagram and on each the browsers I’ve tried, Explorer, Firefox and Google Chrome. The history tab in Gramblr shows the URL of all 35 photos I’ve uploaded. I assume that the URL’s of the unshown photos are written into the source code, otherwise they wouldn’t be appearing on my 3G device, but are blocked from appearing in browsers.
I’ve just checked and the URL of the unshown photos is not written into the webpage source code when I access Instagram using my laptop.