
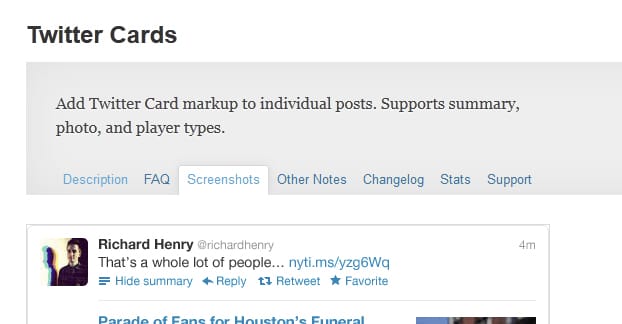
So you know how on Twitter, when someone posts a link to their website, Twitter creates a box that has a thumbnail image, a title, a description, and a URL for the destination page? It’s really common. It makes standard link posts a lot more visible in timelines, it showcases a bit about the destination of the link, and it encourages more user interaction.
That’s a Twitter Card. Specifically, it’s the website summary card, one of several types of Twitter cards that can be integrated into a website. What other types are there?
- The summary card, as mentioned, is a preview of a website. It’s a custom image and text pulled from meta information that ensures a good preview of what a user will see when they click your link.
- The summary card (with large image) is… identical to a summary card. I honestly don’t know why there’s a difference. Click each of the links and view the previewed tweets and see what I mean. I suppose before Twitter’s latest redesign they might have looked different, but today everything looks like a large image card.
- The player card should not be confused with baseball or other sports cards. They’re essentially large image cards, except the image is some form of animated media. Depending on how they’re displayed, they might be small preview and description boxes that expand into media, or just the media itself poised to play. Generally these are embedded video, like YouTube videos, though webms are increasingly popular.
- The app card is a box that pulls data from an app store page to create a customized app promotion window. It shows the salient details of the app linked in the tweet, along with a CTA button to get users to install the app right away.
Twitter cards used to be a lot more complex. There used to be specific types of cards for image galleries, products, and some other options, but Twitter has since removed them. If you want some nostalgia, you can see what they looked like here, just don’t get too attached; you can’t make them today.
The Basics of Twitter Cards
You can only have one kind of Twitter card per website, or at least per web page, if you feel like specifying individual code for every page. Most people choose a basic large image summary card and put the code in the header of their site template, so it shows up on every page. Some sites, like YouTube, will put the player card in their header. The main takeaway here is that you can only have one set of card information in your header meta data on a given page.

Cards are pretty robust in the data they can convey. You can have the card automatically know who created the content and who owns the page, even both at the same time if they’re different. You can specify the media to be loaded, you can specify names and tracking code, and a lot more. In fact, you can read this page to get an idea of the attributes you can use for cards specifically. You can also tie in Open Graph attributes for more robust data.
What I’m going to do here today is tell you how to add Twitter cards to your site. I’m not going to go over every single attribute – the Twitter documentation is good enough – I’m just going to give you the rundown of how to do it for various CMSs.
Before we begin; for every method of installation, you need validation. To make sure you’ve done it right, once you have a card enabled, copy the URL to this validator. This will tell you whether or not the card actually works.
1: WordPress
WordPress is perhaps the easiest platform for implementing Twitter cards, because there are so many different ways to do it, including the one that’s almost built-in.
The recommended way to implement Twitter cards is to use the official Twitter plugin. You can install it just like any other plugin, and from there you can generate your Twitter cards automatically. It also enables sharing and tweet/follow buttons, embedded tweet handling, and shortcodes for analytics tracking. You can read the documentation here and download the plugin itself here.
If you don’t want to use the official Twitter plugin, or if you’re on hosted WordPress.com, you can use Jetpack. In Jetpack, you want to find the Sharing section and configure it. There will be a Twitter section, where you authorize your Twitter account to your website.
A third option is to use the JM Twitter Cards plugin. This plugin, by Julien Maury, adds Twitter card compatibility with some basic settings. You can choose to have it use the first image on your page rather than a featured image, you can preview your Twitter card rendering, and you can customize the card for each post when you create the post. To configure the plugin, navigate to the sidebar and click the plugin panel in your admin dashboard. Choose the type of card and fill out the rest of the boxes with your Twitter account, your site’s account, the description length, and anything else you want to add.
If none of those fit your needs, or if you already happen to have it, WordPress SEO by Yoast also handles Twitter cards. In your admin panel, navigate to SEO and click the Social section. There is a Twitter tab there, where you can add your Twitter username to the box. Unfortunately, last I read, Yoast only supports summary cards; you need more advanced plugins if you want other types of cards.
2: Tumblr
Tumblr is a surprisingly popular blogging platform many people don’t realize has gotten as prolific as it has. The Tumblr network extends beyond just blogs marked with .tumblr.com; in fact, some big name sites are using Tumblr as a base architecture. Once you have a custom domain on it, it’s just like any other back-end architecture. Or is it?
The fact is, Tumblr’s architecture is not expansive or as customizable as something like WordPress. You will have to use some custom code in order to implement specific, customized Twitter cards on your blog. You can read the code and the description behind it here, in the answer given by Dan Leveille on Quora.
It’s worth noting here that this code is require to customize your cards manually; it is not required to simply have summary cards. Twitter has already whitelisted Tumblr.com for automatic card generation on link publication, so unless you want a specific card with specific data, or you’re using a custom domain, you can just use what is implemented by default. I would only resort to his code if you have a custom domain for your Tumblr site, or you want data that Twitter isn’t picking up naturally.
3: Blogger
Installing Twitter cards on a Blogger blog comes down to your template. I’ll give you general instructions, but if your site template varies too much from the norm, you’ll have to figure it out yourself based on the clues I give you.
It’s always recommended that you back up your template before you tamper with it, just in case. Go to your dashboard, click on template, and click on the backup button to save a copy of it for restoration purposes later.
Next, click the “edit HTML” button below the live preview of your blog template. Inside that code, run a search for “<b:includable id=’post’ var=’post’>”. Keep that line where it is, but paste the following directly below it:
<meta content='summary' name='twitter:card'/>

<meta content='@yourname' name='twitter:site'/>

<meta content='@yourname' name='twitter:creator'/>

<meta content='www.yoursite.com' name='twitter:domain'/>

<meta expr:content='data:post.firstImageUrl' name='twitter:image:src'/>

<meta expr:content='data:post.title' name='twitter:title'/>

<b:if cond='data:blog.metaDescription'>

<meta expr:content='data:blog.metaDescription' name='twitter:description'/>

<b:else/>

<meta expr:content='data:post.snippet' name='twitter:description'/>

</b:if>

<meta expr:content='data:post.sharePostUrl' name='twitter:url'/>
Obviously, you will need to edit the data above yourself. Change the @yourname to your Twitter username, change the www.yoursite.com to your site URL, and make sure it’s accurate.
You can, of course, customize this code for your needs. If you prefer a different kind of card, change the top line with something other than “summary” and adapt the rest of the code to the data you need.
In case the code I pasted above doesn’t work, this is the page I got it from. You can double-check to make sure I copied it properly, or that you did, and you can check there in case it has been updated and my post doesn’t reflect the update. Speaking of, if it doesn’t work, let me know. I’ll do my best to fix it.
4: Joomla
Joomla has a lot in common with WordPress, as far as being a CMS with an emphasis on customization via extensions rather than a limited platform with cosmetic enhancements like Tumblr or Blogger. As such, there are a handful of different ways you can implement Twitter cards using different Joomla extensions.

Tweet Cards is one extension most people likely prefer. It’s free to download and use, and it adds Twitter cards to your Joomla-based website. That’s it; there’s nothing fancy in the configuration, there’s nothing exceptional with it’s functionality or implementation, it just does what it says on the tin.
A second option is the pro extension Open Graph and Twitter Card Tags. It’s a more robust extension that adds tags for both Twitter and Facebook. It has plenty of customization options to choose the specific images and data you want for your posts. The Facebook integration of Open Graph is great, plus it adds extra meta data for both Twitter and Google when they come knocking. The only downside is, as a pro extension, this one is gonna cost you. It’s cheap, though; only 7 euros for the license. You can purchase extra support if you like, but let’s be honest; this is just meta data, it’s a glorified copy and paste job for people scared of code. You don’t need support.
The third option I have for you is using TEXTman, a front end post editor for creating and publishing your articles on a Joomla site. You don’t need to configure anything for Twitter cards to work; just use TEXTman as your editor and it brings the feature automatically. The downside here being that it’s a pro tool as well, and a much more expensive one. Since it’s a whole text editor and associated tools, it’s a big license with several extensions added on. It’ll cost you $99 for a subscription with everything, or $40 for just TEXTman itself and a limited support and update license. Very expensive if all you want are Twitter cards.
Finally, of course, you can use the method below or described in this post to implement them manually.
5: Custom Content Management Systems
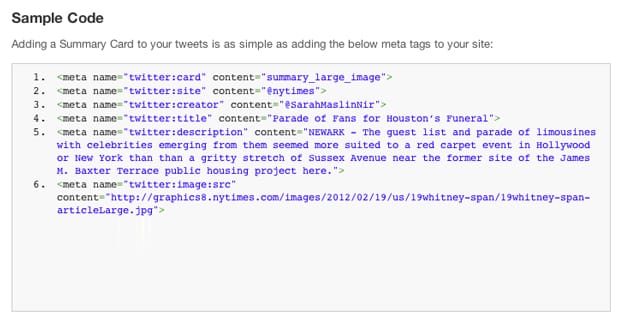
I’ve already posted an example of the meta data in code up above. That’s basically the same code you paste into the header of your site, regardless of what architecture you’re using. Tweak things according to your site needs and copy the code into your site header. It doesn’t matter specifically where it is, so long as it’s between the <head> and </head> tags at the top of the site.
Don’t forget to customize the tags. The mains ones you need to pay attention to are the card, site, creator, and domain tags. Those should be filled out with the type of card you want, the Twitter handle of your site and of the content creator, and the URL of your domain. Then validate the card once you’ve implemented the changes.
If your card still doesn’t work after validation, you should read through Twitter’s troubleshooting guide. Chances are there’s a simple error somewhere that you can fix in a few seconds.