One key on the massive keyring of success with marketing is accurate data tracking and analytics. You get a lot of this as a basic entry level setup just by using Twitter Analytics and Google Analytics, for Twitter and your website respectively. However, you can take things one further by adding tracking functionality and enabling conversion tracking.
Conversion tracking is a marketing feature Twitter supports natively, though you will need to do some setup and get the whole thing started. When it’s enabled, you will be able to measure the returns of your Twitter ads through Twitter’s Analytics with a lot of detail. You’ll be able to see when a user clicks through to your site from Twitter, and what actions they take on your site once there, something you don’t get just from URL parameters.
Conversion tracking is generally used for actual sales, the prototypical “conversion” action, but can also show other kinds of conversions, like signing up for a mailing list or even just clicking on a specific link.
It’s worth it to note here that conversion tracking is a feature of Twitter ads. If you’re not able to access advertising on Twitter, or if you’ve been banned from the program, you won’t be able to get value out of conversion tracking on its own.
Setting Up Conversion Tracking
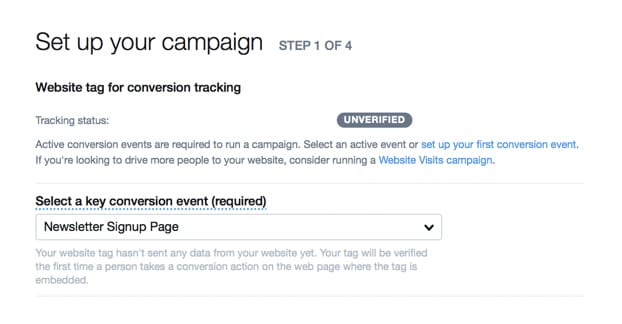
Once you have set up at least one Twitter ad – and consequently have full access to the ads system, rather than the limited prompt asking you to make an ad that you get if you haven’t made one yet – you can find a tools menu in the navigation bar. In that tools menu, you will find an option for creating a website tag. Specifically, click Tools and, in the drop-down, click Conversion Tracking. From there, click Create New Website Tag.
![]()
A website tag, also known as a tracking pixel, is a piece of code you put on your website. It can go either in one spot or across your whole site, depending on the kind of tag you want to make, and will track data on that page. Pages without tags won’t track data, so they’ll seem like black holes on your site; I recommend at least using a full website tag.
There are two types of tags you can have on your site. One of them is the universal tracking tag. This is the tag you place in your site structure on every page, and it tracks general information and multiple conversions across your site. If you have a hundred different product pages and want to track any product sale as a conversion, you would use this kind of tag.
The other kind of tracking tag is the single-event tracking tag. It’s a unique snippet of code that can be placed on a single page or on a small handful of pages, to track one specific conversion. This code is best used to track conversion events that are not triggered on page load. For example, forms on the page that send data without a refresh or a confirmation page might want this kind of tracking.
In general, you’re going to want to use a general website-wide tracking snippet rather than a single-event snippet.
Conversion Events
Next, you will need to create your conversion events. There will be an event details screen where you can set these up. Each unique conversion event – a mailing list sign-up, a product sale, a lead submission, or what have you – should be named something specific enough that you will remember. You can create new events whenever you like and assign them to specific actions, so you could for example assign product sales during a specific time period to be “back to school sales” rather than just product sales. It’s up to you how deep you want to dive into conversion tracking on an individual conversion level.
With a standard-site wide conversion pixel, as far as I’m aware, you can create as many different tracked conversion actions as you like. On the other hand, if you want to use a single-event snippet, you will need to create a new snippet for each new event, up to a maximum of 25 events. The code for the specific event needs to be present on the page that confirms that action has been taken, so don’t use one generic confirmation page for a bunch of different conversions as a shortcut.
When you’re creating a conversion event, you have to choose from one of five different categories. When you’re looking at your analytics later, your reports will be divided by conversion type rather than tag or action, so this is important to properly define. The five different possible conversion types are:
- Site visit. This conversion is simply the user landing on a specific page on your site. Useful for landing pages or for confirmation pages in some cases. Generally it’s best used for a site-wide CTA like a sidebar ad leading to a landing page.
- Purchase. This is, obviously enough, the action of making a purchase. There’s not really much nuance to explain about it; set up a conversion action for when a user makes a purchase and ends up on a confirmation page, and track that information via Twitter analytics.
- Download. This one is for when a user downloads a file from your site. Now, I don’t mean just the normal act of downloading pages and data that comprises normal web browsing; I mean specific downloads. For example, if you’re offering a free ebook, a white paper, a full size infographic, or a template resource, the act of downloading the file itself would trigger this conversion once you have it set up properly.
- Sign up. This is the conversion action for when you have a form submission for a newsletter signup or service registration. It’s generally best used for email communication signups, but you can use it for anything you would actually term signing up.
- Custom. If the four above conversion actions don’t quite cover what you want them to cover, you can use this one and define your own action. There are probably some limitations, but I’ve found that it works quite well for basically any conversion action you could want to track.
Attribution Windows
Once you have chosen your desired conversion action, you can set the post-engagement attribution window. This is the time window for how long you should allow Twitter to take credit for the conversion. If you want to give Twitter referral credit for a very short amount of time, the shortest available window is a single day. If the user comes back the next day, even though they were initially referred through Twitter, they won’t show as having come from Twitter.
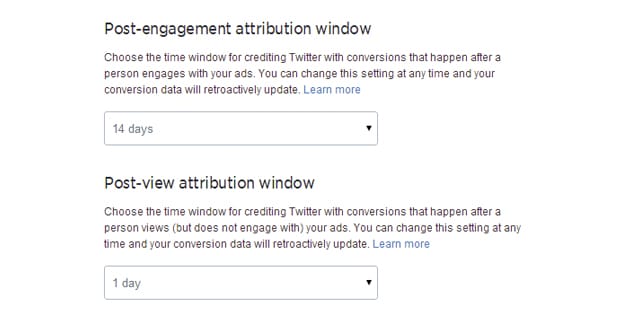
If you want to see more long-term effects of Twitter on your conversions, you can set a longer timeframe for attribution. The longest possible setting is 90 days. If someone clicks through to your site from Twitter and then doesn’t convert until two months later, they would still be counted as a Twitter referral with a long enough setting. The full list of options are 1, 2, 3, 4, 5, 7, 14, 30, 60, and 90 days. You can’t make it more granular, unfortunately. The default is 14 days.
Interestingly, Twitter actually records data for the longest possible attribution even if you have it set for a single day. This allows them to retroactively update your data if you choose to change the attribution window after the fact. If you have it set to the default 14 but are interested to see if your numbers are better or worse looking at things from a 90-day perspective, you can change it and see right away. There is no penalty for doing so and reverting the change will revert the data.
Similar to the post-engagement attribution window, Twitter also has a post-view attribution window. When your promote post is shown in a feed but the user does not click on it or engage with it in any way, normally that would not trigger any sort of attribution. However, if the user then goes to your website independently, it might have been because they saw you in their feed. Not everyone actually engages with their Twitter feed all that much.
The post-view attribution allows you to track the people who see your ads and who then come to convert, which can give you an idea of how accurate your targeting is towards your ideal users. Just like with post-engagement, post-view attribution windows can be set to 1, 2, 3, 4, 5, 7, 14, 30, 60, and 90 days, with the additional option of zero if you want it turned off entirely. The default is one day, but it’s up to you whether or not the data is useful enough to enable it or track it on a longer term basis.
Adding the Tags
Once you have generated your tags and have everything configured the way you want it, you need to add the tags to your website. If you’re using a specific tag, you need to put it on the page that loads as a confirmation for the single action you want to track. If you’re using a site-wide tag, you will need to put it on every page on your site. Generally, you should have a template file or some easy way through your CRM to add tracking tags like this. You can look up the installation method for Google Analytics if you like; they should function the same way, but your web hosting or CRM is more likely to have an FAQ dedicated to Google than to Twitter.
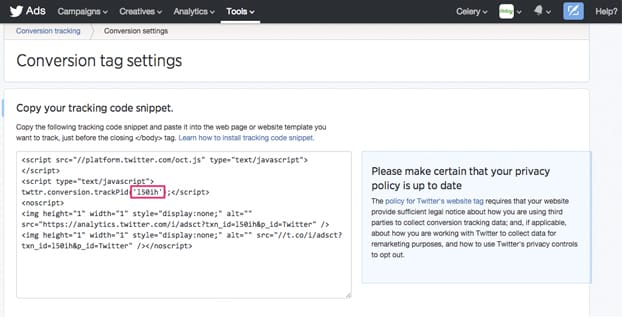
In any case, you need to add the code snippet to your HTML at the end of the Body section, just before the </body> tag. If your CRM has a tag management system or a container tag, you can add it there instead. Depending on how you access your site, you might need the assistance of a developer to add the code.
Once you have added the tag, all that’s left to do is wait. After a few hours, you can go back to Twitter’s ads dashboard and check to see the status of the tag. If the tag has not yet started working, the status of the tag will be “unverified.” If the tag works, it will be changed to “tracking.” There’s a third status, which is “inactive.” Inactive simply means that the tag has not been triggered in over 24 hours. If you know you’ve sent Twitter referral traffic, it might be worth looking into why it isn’t working. If not, it’s possible that you just haven’t had anyone set off that particular conversion.
Tailored Audiences
While setting this all up, you might have seen mention of tailored audiences. A tailored audience is an audience used for marketing, made specifically from the people who trigger your tracking pixel. It’s a potent tool for remarketing, because it creates a specific audience of people who have been verified to already have clicked on or engaged with your tweets in some way. You can enable a tailored audience building option when you create the website tag.
To make use of a tailored audience, simply create a new ad and use the tailored audience as the target audience. This audience will be variable based on the people who you send from your Twitter feed to your website, so it will always be kept up to date with the most recently engaged users in your following.